Azure Managed App + Container Offer
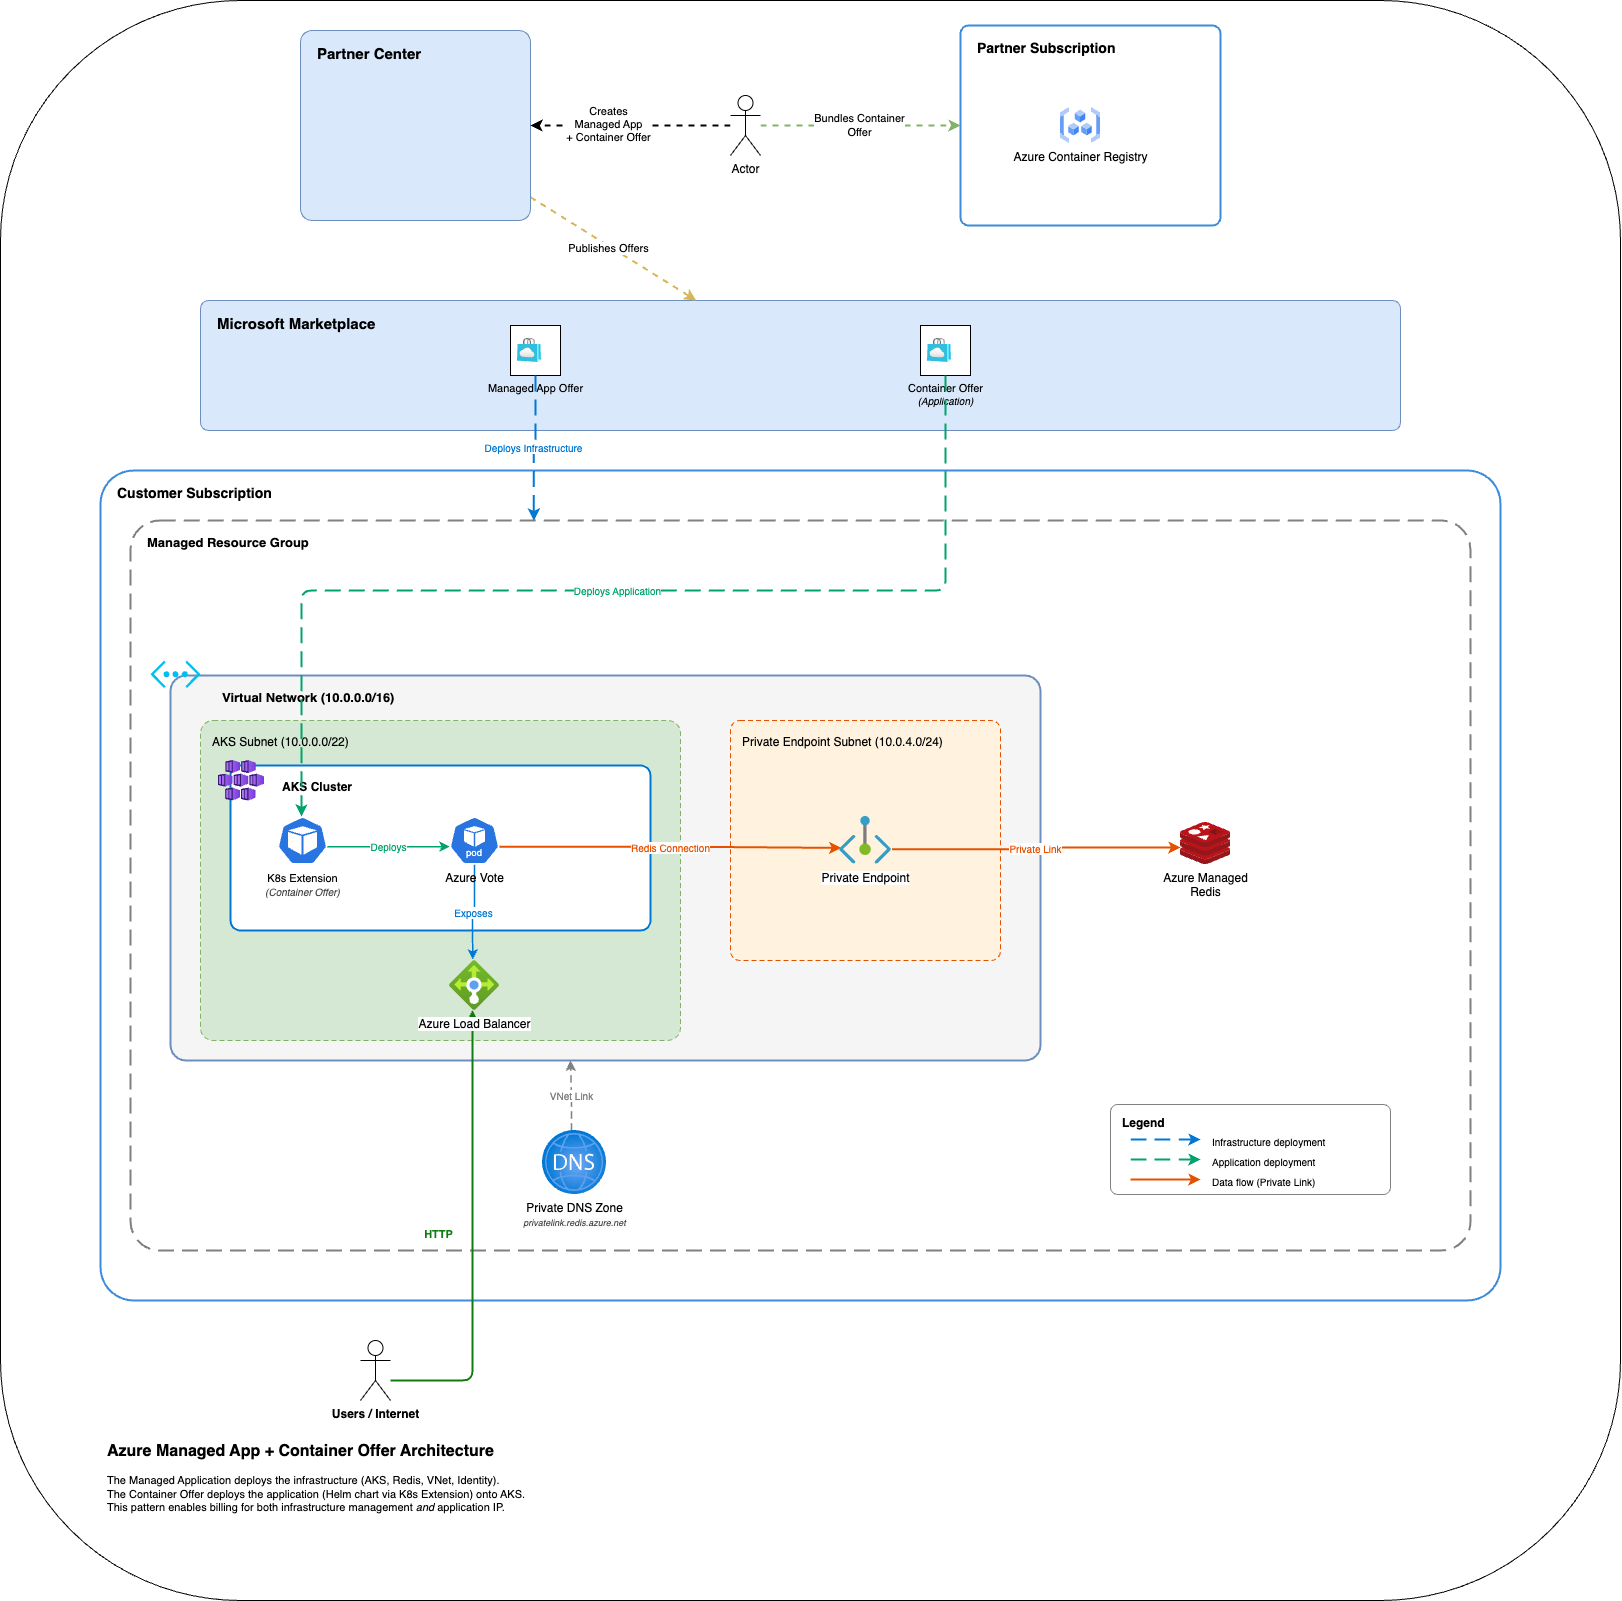
This repository contains two Azure Marketplace offers based on the Azure Voting App Redis sample application.
Why Two Offers?
Azure Marketplace has different offer types, and each one has different rules around pricing, customer visibility, and infrastructure control. This repo demonstrates how to combine a Managed Application offer with a Container Offer to cover all those scenarios.
Scenario 1: Control what the end customer sees
With a Managed Application, the publisher can retain control over the managed resource group. The end customer can see that the application exists, but they cannot directly access or modify the underlying infrastructure (AKS cluster, Redis cache, networking, etc.). This is ideal when you want to present a turnkey solution and prevent customers from making changes that could break the application or violate your support model.
Scenario 2: Charge for infrastructure management
Azure Marketplace offer types have different billing models:
- VM Offers and Container Offers only let you charge for your intellectual property (IP) — the software itself. You cannot charge separately for managing the underlying infrastructure.
- Managed Application Offers let you charge for the ongoing maintenance and management of the solution, because you (the publisher) are responsible for operating the infrastructure on the customer’s behalf.
If you want to charge for both your application IP and the management of the infrastructure it runs on, you need to split the solution into two offers:
- Managed Application — deploys and manages the infrastructure (AKS, Redis, VNet, etc.) and bills the customer for that management.
- Container Offer — deploys your application (via a Helm chart / Kubernetes extension) into the AKS cluster provisioned by the Managed Application and bills for the software IP.
This pattern lets you capture revenue for both the software and the operational overhead while keeping a clean separation of concerns.
Offers
container-offer/ — Azure Container Offer
A Kubernetes Application offer that installs the voting app Helm chart onto an existing AKS cluster via the Microsoft.KubernetesConfiguration/extensions API. The ARM template contains only the extension resource.
managed-app-offer/ — Azure Managed Application
A Managed Application offer that deploys the complete infrastructure stack:
- AKS cluster with Azure CNI networking
- Azure Cache for Redis (TLS-only, private endpoint)
- Virtual Network with AKS and private endpoint subnets
- Private DNS zone for Redis private link
- User-assigned Managed Identity
- The voting app Container Offer extension
Before You Start: Replace Placeholders
This repo ships with <YOUR_...> placeholder values that must be replaced with your own account-specific values before deploying. The table below lists every placeholder, where it appears, and where to find the real value.
| Placeholder | Files | Where to find the real value |
|---|---|---|
<YOUR_PUBLISHER_ID> |
ARM templates (variables section), manifest.yaml |
Partner Center > Account settings > Publisher ID |
<YOUR_OFFER_ID> |
ARM templates (variables section) |
Partner Center > Your offer > Offer ID |
<YOUR_PLAN_ID> |
ARM templates (variables section) |
Partner Center > Your offer > Plan overview > Plan ID |
<YOUR_EXTENSION_NAME> |
ARM templates (clusterExtensionTypeName variable) |
Partner Center > Plan > Technical Configuration > Cluster Extension Type (the part after the dot) |
<YOUR_ACR_NAME> |
manifest.yaml, values.yaml, porter.yaml |
Your Azure Container Registry name (e.g. myacr for myacr.azurecr.io) |
<YOUR_BUNDLE_NAME> |
manifest.yaml, porter.yaml |
Your CNAB bundle name (e.g. com.contoso.myapp) |
<YOUR_PUBLISHER_DISPLAY_NAME> |
manifest.yaml |
Your company/publisher display name |
Tip: Search the repo for
<YOUR_to find all placeholders:grep -r '<YOUR_' --include='*.json' --include='*.yaml'
How to Use This Repo
This section walks through the end-to-end workflow for building, testing, and publishing both offers. Each step builds on the previous one.
Set environment variables
These variables are used throughout the walkthrough. Set them once and they’ll carry through each step.
export RESOURCE_GROUP="rg-voting-app-test"
export LOCATION="centralus"
export IMAGE_NAME="azure-vote-front"
export IMAGE_TAG="v1"
Step 1: Deploy the infrastructure (without the container offer)
Deploy AKS, Redis, VNet, and supporting resources to make sure the infrastructure works exactly as you want — before adding any application on top.
./managed-app-offer/scripts/deploy.sh
This uses the infra-only-template by default. Resource names are auto-generated with a unique suffix. Review the deployed resources in the Azure Portal and tweak the template until you’re satisfied.
Customize the infrastructure: The infra-only template deploys AKS, Redis, VNet, and supporting resources. You may want to modify infra-only-template.json to change the infrastructure (e.g. different Redis SKU, node pool size, networking CIDR ranges). These same changes should also be applied to managed-app-offer/arm-template/mainTemplate.json so the two templates stay in sync.
After deployment, capture the resource names and get AKS credentials:
export AKS_NAME=$(az aks list -g $RESOURCE_GROUP --query "[0].name" -o tsv)
export REDIS_NAME=$(az redisenterprise list -g $RESOURCE_GROUP --query "[0].name" -o tsv)

az aks get-credentials -g $RESOURCE_GROUP -n $AKS_NAME
Step 2: Build and push the container image
Create an ACR, build the voting app image, and attach the ACR to AKS so it can pull images:
export ACR_NAME="acrvotingtest${RANDOM}"

# Create an Azure Container Registry
az acr create -g $RESOURCE_GROUP -n $ACR_NAME --sku Basic

# Build the image using ACR Tasks (no local Docker needed)
az acr build \
  -r $ACR_NAME \
  -t $IMAGE_NAME:$IMAGE_TAG \
  container-offer/app/

# Attach ACR to AKS so the cluster can pull images
az aks update -g $RESOURCE_GROUP -n $AKS_NAME --attach-acr $ACR_NAME
Step 3: Deploy the app via Helm manually
Install the voting app onto the AKS cluster using Helm directly. This validates that the application works on top of your infrastructure before packaging it as a Marketplace offer.
# Get Redis credentials
export REDIS_HOST=$(az redisenterprise show -n $REDIS_NAME -g $RESOURCE_GROUP --query hostName -o tsv)
export REDIS_PASSWORD=$(az redisenterprise database list-keys --cluster-name $REDIS_NAME -g $RESOURCE_GROUP --query primaryKey -o tsv)
export REDIS_PORT=$(az redisenterprise show -n $REDIS_NAME -g $RESOURCE_GROUP --query "databases[0].port" -o tsv)

# Install via Helm
helm install azure-vote container-offer/helm-chart/azure-vote/ \
  --set global.azure.images.azureVoteFront.registry=${ACR_NAME}.azurecr.io \
  --set global.azure.images.azureVoteFront.image=$IMAGE_NAME \
  --set global.azure.images.azureVoteFront.tag=$IMAGE_TAG \
  --set redis.host=$REDIS_HOST \
  --set redis.port=10000 \
  --set redis.ssl=true \
  --set redis.password=$REDIS_PASSWORD

# Verify the app is running
kubectl get svc -l app=azure-vote-front -w
At this point, you have verified the infrastructure + Helm chart work as expected. Now, we will focus on packaging those into the respective Marketplace Offers.
Step 4: Create and publish the Container Offer
Once the Helm chart works, package and publish the Container Offer in Partner Center:
- Create a new Container offer
- Configure your plan with the CNAB bundle and Helm chart
- Submit for publishing (start with Preview to test before going live)
See the container-offer README for packaging details.
Step 5: Test the published Container Offer extension via ARM
After the Container Offer is published (at least to Preview), test installing it as a Kubernetes extension on the existing AKS cluster.
Before deploying, update the variables in container-offer/test-install-extension/mainTemplate.json to match your published offer:
| Variable | What to change |
|---|---|
plan-name |
Your plan ID from Partner Center |
plan-publisher |
Your publisher ID from Partner Center |
plan-offerID |
Your offer ID from Partner Center |
releaseTrain |
stable for published offers, preview for testing |
clusterExtensionTypeName |
Format: <publisher-id>.<extension-name> — find it under Plan > Technical Configuration > Cluster Extension Type |
See the test-install-extension README for details on where to find each value.
az deployment group create \
  --resource-group "$RESOURCE_GROUP" \
  --name "test-extension-$(date +%Y%m%d%H%M%S)" \
  --template-file container-offer/test-install-extension/mainTemplate.json \
  --parameters \
    clusterResourceName="$AKS_NAME" \
    redis_host="$REDIS_HOST" \
    redis_port="$REDIS_PORT" \
    redis_ssl="true" \
    redis_password="$REDIS_KEY"
Tip: For the first deployment, deploy through the Azure Portal to accept the Marketplace legal terms. Subsequent deployments can use the CLI.
See the test-install-extension README for full details.
Step 6: Delete all infrastructure and start from scratch
Clean up everything so you can test the full Managed App deployment end-to-end:
cd managed-app-offer/scripts/cleanup.sh
Step 7: Deploy the full Managed App (with extension)
Deploy the complete stack — infrastructure plus the container offer extension — using the full ARM template.
Before deploying, update the variables in managed-app-offer/arm-template/mainTemplate.json to match your published Container Offer:
| Variable | What to change |
|---|---|
plan-name |
Your plan ID from Partner Center |
plan-publisher |
Your publisher ID from Partner Center |
plan-offerID |
Your offer ID from Partner Center |
releaseTrain |
stable for published offers, preview for testing |
clusterExtensionTypeName |
Format: <publisher-id>.<extension-name> — find it under Plan > Technical Configuration > Cluster Extension Type |
You may also want to customize the configurationSettings in the Microsoft.KubernetesConfiguration/extensions resource to match the Helm values your app requires. The current template passes vote.title, vote.value1, vote.value2, and Redis connection settings.
Before deploying, run ARM template validation using the ARM Template Test Toolkit (arm-ttk) and fix any issues: https://learn.microsoft.com/en-us/azure/azure-resource-manager/templates/test-toolkit
cd managed-app-offer/scripts/deploy.sh --with-extension
This validates that the mainTemplate.json works correctly before publishing to the Marketplace.
Step 8: Create and publish the Azure Managed Application
Package the ARM templates and publish in Partner Center.
Before packaging, verify you have customized these files:
- mainTemplate.json — The
variablessection must contain your offer’splan-publisher,plan-offerID,plan-name,releaseTrain, andclusterExtensionTypeName(same values as Step 7) - createUiDefinition.json — Customize the wizard UI if you changed parameters (e.g. added/removed fields, changed allowed values, updated labels)
- viewDefinition.json — Customize the managed app dashboard views shown to the customer after deployment
cd managed-app-offer/arm-template
zip managed-app-package.zip mainTemplate.json createUiDefinition.json viewDefinition.json
Then in Partner Center:
- Create a new Azure Application offer (Managed Application type)
- Upload
managed-app-package.zipin the Technical Configuration - Submit for publishing
Step 9: Deploy from the Azure Portal (end-to-end test)
Once the Managed App is published (at least to Preview):
- Go to the Azure Portal
- Search for your offer in the Marketplace
- Walk through the
createUiDefinitionwizard to deploy - Verify that all resources (AKS, Redis, VNet, extension) are created correctly
- Access the voting app via the external IP
This is the final validation that customers will have a working experience.
Repository Structure
├── container-offer/              # Azure Container Offer (extension only)
│   ├── app/                      #   Application source + Dockerfile
│   ├── helm-chart/               #   Helm chart for Kubernetes
│   ├── arm-template/             #   ARM template (extension resource only)
│   └── manifest.yaml             #   CNAB packaging instructions
│
├── managed-app-offer/            # Azure Managed Application (full stack)
│   ├── arm-template/             #   ARM template (all infrastructure)
│   └── scripts/                  #   Test deployment & cleanup scripts
│
└── README.md